The Startup Guide To Managing Your Email Reputation in 2025
(and avoiding the spam folder)
Email is a powerful engagement channel, even in the age of mobile and push notifications. However, if you’re a startup, setting up your email sending infrastructure and monitoring your reputation can be overwhelming and complicated. I’ve seen multiple startups that have struggled with email reputation issues and having their emails end up in the spam folder. This guide is based on what I’ve learned from working in email for many years at a scale of sending billions of emails per month. First I’ll break down the basics of setting up some of the technical configuration (DNS records, domains, IP pools, etc.,) to create a reputational firewall between the different types of email you send. Then I cover operational tips on how to manage and protect your sender reputation so your emails don’t end up in the spam folder.
How To Set Up Your Email DNS Records
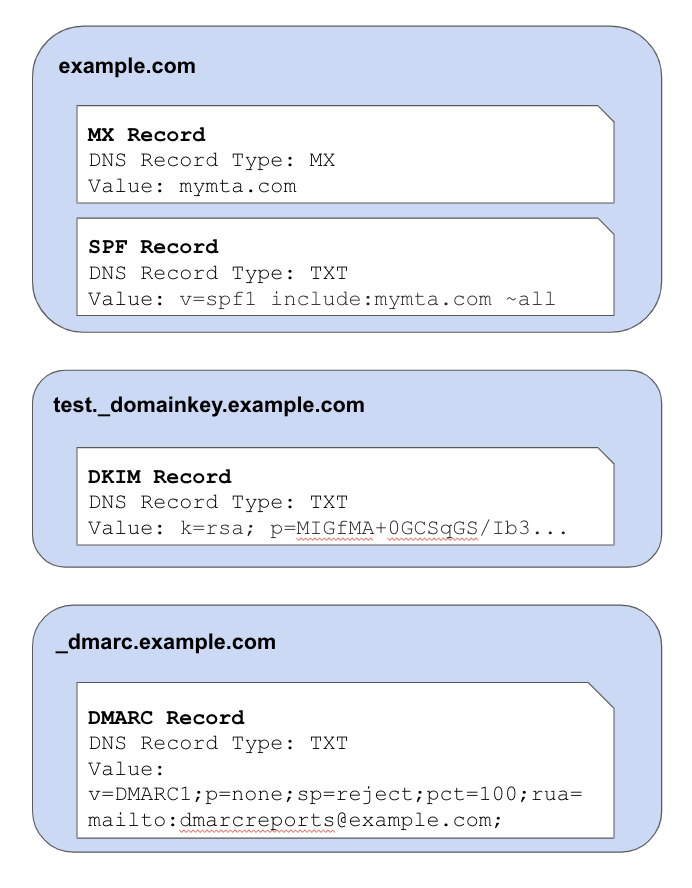
This section is quite technical, so feel free to skip ahead to the next section (Domain & IP Pools) if you aren’t interested in hearing the gory technical details on how to set up your email DNS (Domain Name System) records. Setting up your email DNS records can be complicated because email requires a number of different DNS records to implement various protocols that have been developed over the years. You will need to set up the following records to send and make sure email service providers (ESPs) can authenticate your email and your reputation is protected:
MX Record – The MX record is a DNS record that goes under your domain (ex: mymta.com) which instructs people trying to send to that domain which servers they should send them to. This will be the servers of your Mail Transfer Agent (MTA), which is the company you use to send/receive email (ex: Amazon SES). Or, if you decide to go the DIY route instead of using an MTA, you set up a few servers running postfix/sendmail, create a subdomain (ex: mxa.example.com) with an A record pointing to the IPs of those servers, and then point your MX record to the subdomain(ex: example.com would point to mxa.example.com).
PTR Record – The PTR record enables what is known as a reverse DNS lookup. ESPs use this as a simple spam check when receiving an email from a certain IP by verifying what domain that IP belongs to. If you’re using an MTA with a shared IP, you won’t need to set this up. However if you are managing your own dedicated IPs, you can read more about how to set up your PTR record here.
SPF Record – This is a TXT DNS record that goes under your domain (ex: example.com) that is used as part of the Sender Policy Framework. Basically, it is a way of specifying which IPs are allowed to send emails for your domain. It will typically look something like “v=spf1 include:mymta.com ~all” where example.com is the domain of your MTA. One common mistake when companies use multiple email services is they will create separate SPF records for each service. Technically the SPF standard stipulates there should only be one SPF record and if you are using multiple email services you need to concatenate them like this. Some ESPs will correct for multiple SPF records automatically, but not all of them do.
DKIM Record – DKIM is another TXT DNS record which goes under the <selector>._domainkey.<your domain> (ex: test._domainkey.example.com). This record is needed for the DomainKeys Identified Mail protocol. The way it works is you cryptographically sign an email using a private key and then add the DKIM-Signature header to the email including the cryptographic signature and a pointer to the DNS record containing your public key. When an ESP receives the email it can then automatically look up your public key using the DKIM-Signature and authenticate the sender was authorized to do so. Without DKIM, any other customers of your MTA could potentially spoof sending emails as you.
DMARC Record – This is a TXT DNS record that goes under _dmarc.<your domain> (ex: _dmarc.example.com) which implements the Domain-based Message Authentication, Reporting and Conformance (DMARC) protocol. It basically instructs email service providers on what to do if they receive an email purporting to be from your domain but fails the SPF or DKIM check. You should set your DMARC policy to “reject” so that ESPs will not accept emails from spammers attempting to spoof your emails.
How To Set Up Your Email Domains & IP Pools
Email service providers assign a reputation to domains, subdomains, IP addresses, and sender email addresses, and use these reputation signals in combination along with the content of the email to decide if an email is spam and if it should be delivered to the receiver’s inbox. The reputation is based on historical engagement rates and reported spam rates the email service provider has seen in the past from that IP, domain, etc.
Domains
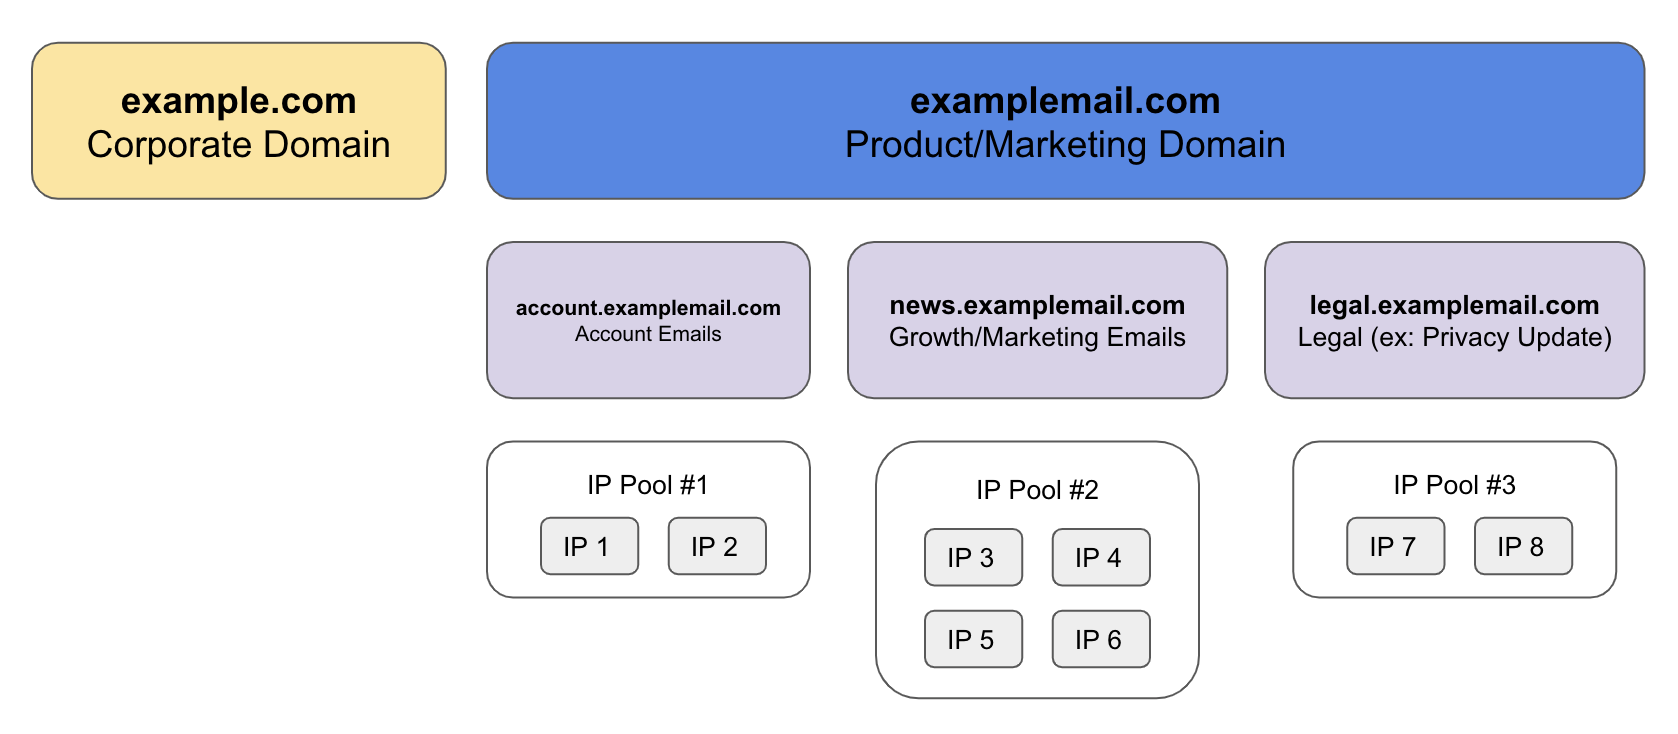
When it comes to setting up your domains, IPs, etc., the number one rule is to create a reputational firewall between your different classes of email. You don’t want to send a newsletter out that has poor engagement and cause your users to suddenly stop receiving their password reset emails, or even worse, cause all your corporate email to get marked as spam and you can no longer communicate to clients, vendors, lawyers, etc. (there are companies this has happened to before!) Follow these two rules on how to structure your email sending domains:
Rule #1: Separate your corporate emails and product/marketing emails into completely separate domains. A couple examples of how people do this: Facebook uses fb.com for corporate email and facebookmail.com for product/marketing emails. Slack uses slack-corp.com for their corporate email and uses slack.com for their product/marketing emails.
Rule #2: Create separate subdomains for different classes of email. For instance, you may want to use account.example.com for account emails such as password resets and news.example.com for marketing announcements.
IP Addresses
You have a few choices when it comes to what IPs you send from.
Shared IPs – This is the cheapest option, where the IP you send from will be shared with other customers of the MTA that you’re using. The reputation score assigned to your email will be influenced by the quality of email from every other sender that is sharing that IP. MTAs will also aggressively clamp down on allowing you to send from a shared IP if your email has high spam rates. On the plus side though, the shared IP already has an established reputation, so you can ramp up and down in volume relatively quickly without much trouble.
Private IPs – This option is more expensive but gives you much more ownership over your reputation because you’re not sharing the IP with anyone else. The downside is IPs need to be “warmed up,” which means you need to ramp the volume of email you’re sending from the IP slowly over time. Start off with sending a couple dozen emails per day and then increase by 50%-100% per day at lower volumes. Start to taper the increases to 15-20% increase per day as your volume really starts to ramp up until you reach your target volume. This warm up period is necessary because a common pattern for spammers is to get a new IPs and then immediately start blasting out a ton of email, so ESPs are very wary of sudden significant increases in volume. Ramping up slowly helps give ESPs time to start to measure and understand your reputation as a sender.
Bring Your Own IP (BYOIP) – Not all MTAs support this, but BYOIP is similar to private IPs; instead of the IP being owned by the MTA, they are owned by you. This option can help you avoid vendor lockin or going through the pain of ramping up new IPs if you ever decide to switch to a new MTA. However, in most cases you need to purchase a minimum block of 256 IP addresses (a /24 IPv4 block) which makes this the most expensive option in terms of upfront costs.
Two tips when it comes to managing your IPs:
Tip #1: Decide how many IPs you need. You probably want to start with 2-4 IPs per sender subdomain at a minimum. For higher volume subdomains, allocate more IPs. Start to scale up when the email queues start to back up on your end or the receiver end. Many smaller ESPs have limitations on the number of emails they can receive per second from a single IP (I’m looking at you orange.fr.) If you’re starting to exceed the capacity you will likely start to see SMTP 421 or 451 response codes that indicate the receiving ESP is rate limiting and you may need to scale up your number of IPs.
Tip #2: To help protect your reputation, you can set up a subdomain and small IP pool purely for testing riskier experiments. Keep the subdomain and IP pool warm by sending normal product email traffic through it. When you want to test a riskier experiment, such as emailing a bunch of dormant users, you can channel the emails for that experiment through this test pool to monitor how it impacts delivery and reputation of the test pool and avoid potentially harming your established domains and IPs.
Email List Management
Email service providers also use engagement rates (open rate, clickthrough rate, and spam report rate) as strong signals for reputation. Besides the content of your email, the audience that you send to can have a huge impact on email reputation.
Decide between double opt-in and single opt-in. Single opt-in is when someone signs up for your website and you start sending them email. Double opt-in is when they sign up, you send them an email confirming their email address and they must click that email for you to keep sending to them. Double opt-in results in a cleaner list of emails but has less reach, so decide what is best for you. Especially if you’re having reputation problems or issues with fake signups (see email bombing), you may want to consider double opt-in. There are also services like BriteVerify that check email addresses to see if they are real accounts through a combination of opening an SMTP connection to see if the domain and account exists on the SMTP server and also combining data from across all their customers.
Once you’ve added an email address to your list, you also need to periodically go and remove email addresses for accounts that have not used your product or opened any of your email in the past 3-6 months even if they have not unsubscribed. There are a few reasons you should do this:
1) The ROI from sending to these accounts is almost always very low because they have been ignoring all your past emails.
2) These accounts have really low engagement with your emails, significantly dragging down your overall open rate and clickthrough rate and impacting your sender reputation.
3) Sometimes anti-spam companies acquire expired domains, sit on them for a while, see who is still sending to those domains and mark those companies as spam.
Managing Email Unsubscribes
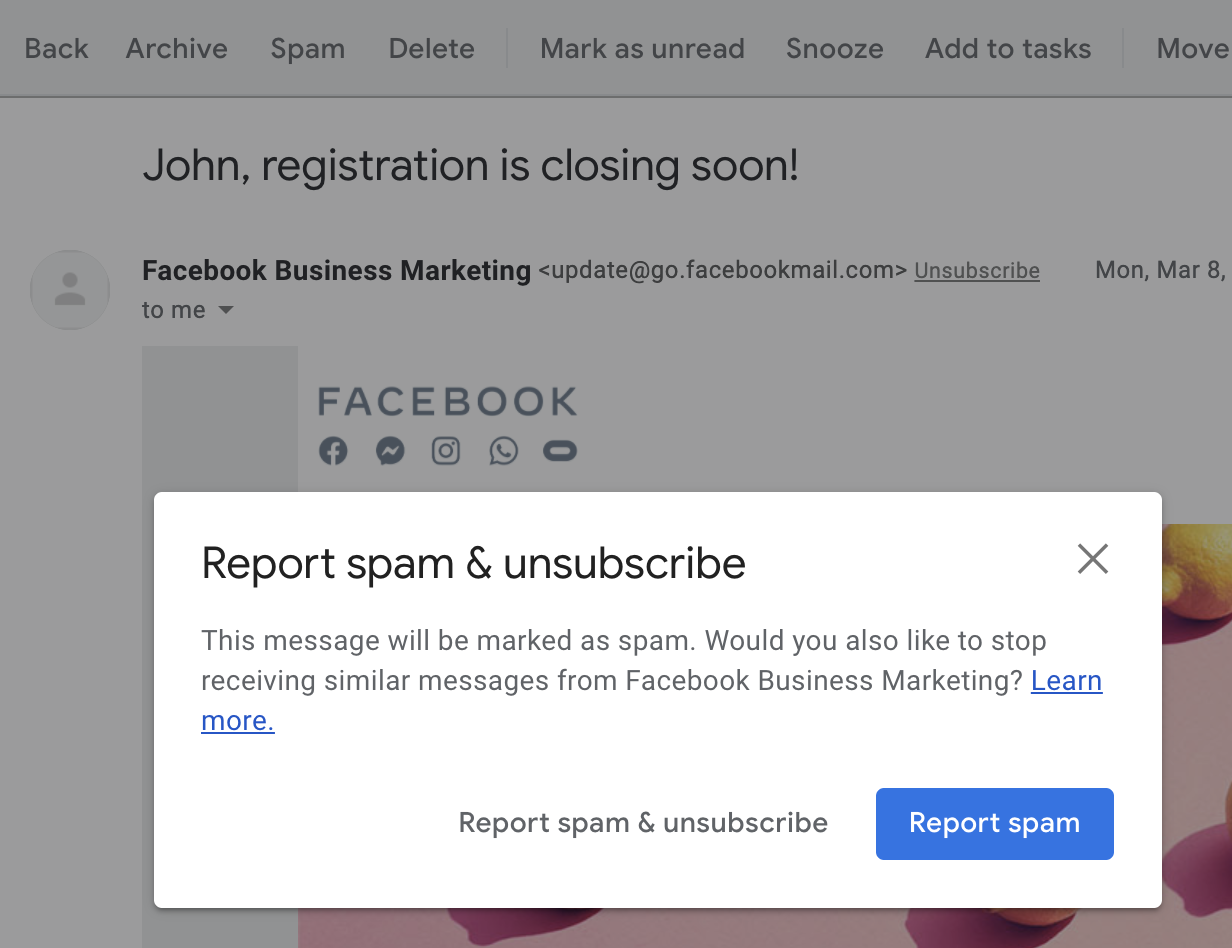
The number one mistake startups sometimes make when it comes to unsubscribes is they make unsubscribing difficult. They think that if they make it challenging, the person will give up, stay subscribed and eventually become a user. What people really do if your unsubscribe flow is too difficult is go back to their inbox and mark you as spam which hurts your sender reputation. So here are some dos & don’ts for unsubscribes:
Don’t
- Make your unsubscribe link hidden or hard to find.
- Require users to sign into an account in order to unsubscribe.
Do
- Include the List-Unsubscribe header in your email. Some ESPs will provide a native unsubscribe button in their UI that utilizes this List-Unsubscribe header. When a user clicks that button, the ESP will send you an email notifying you that the user wishes to unsubscribe.
- For sending to US based users, include your company’s postal address in the footer of every product/marketing email. This is not strictly tied to unsubscribes, but it is a legal requirement under CAN-SPAM or you risk a $40k fine per violation. This requirement informs consumers on who is mailing them and ensures consumers have a way of contacting the sender.
When it comes to making changes to your email program to try and keep more people opted into your mailing list, you should be acutely aware that unsubscribes follow exponential decay functions based on the number of days after signup. This leads to a heavy survivorship bias in the current set of users opted in to your emails. If you really want to see how changes to frequency, content or your unsubscribe flow impact users unsubscribing, you need to look at how that experiment impacts brand new users.
How To Monitor Your Email Reputation
There are services out there which help you monitor your reputation. However, if you’re sending at scale, I’ve found one of the most effective ways to monitor reputation is to just monitor mail acceptance rate, open rate, and clickthrough rate by receiver domain. The first thing to monitor is look for gradual declines over an extended period of time. Compare the number of unique opens and clicks this week to 4 weeks ago for a particular domain and look at the domains with the biggest percentage declines. To reduce noise, make sure to filter out domains that had low volume both weeks since small sample sizes can have high variance. The second is looking for receiver domains whose send volume is relatively high but the open rate, clickthrough rate, etc., are 2 standard deviations below average. This can help you identify problem domains and you can start to dig in and investigate to figure out what is wrong. Some things to look at are the SMTP codes returned when emailing to those domains, patterns of suspicious user signups using those domains, or potentially reach out to the company and see if they are willing to take a look at why your email isn’t getting delivered.
Different players in the email ecosystem also provide their own tools to help you monitor your reputation:
1) AOL, Yahoo, Hotmail, etc., provide a complaint feedback loop where they will forward you emails that their users have complained about or reported as spam. This can be valuable for diagnosing why some people are marking your emails as spam by digging into patterns on who is unsubscribing or what emails they are unsubscribing. For instructions on how to register for the feedback loops of various ESPs, go here.
2) Gmail unfortunately doesn’t forward specific emails that are reported as spam, but you can get a very simplistic view of how Google views your sender reputation by registering for Gmail’s Postmaster Tools. A reputation of anything less than high (green) would likely result in degraded delivery rates to Gmail users.
3) Microsoft has Microsoft Smart Network Data Services (SNDS) which allows you to monitor your IP reputation with msn.com, hotmail.com, etc.
4) Set up [email protected] and [email protected] and make sure they go to a monitored inbox so you can deal with spam complaints.
5) Spam blacklist providers such as SpamCop, SpamHaus, etc., also will report back on email reported as spam if you register an abuse@ email at abuse.net.
If you find that your emails are going to spam and you’ve been following all the best practices, you can also request manual review from the ESPs
Managing Your Email Program
Finally, now that you have your email systems all set up, you want to protect your reputation and make sure you don’t accidently tank it; getting out of a poor sender reputation can be painful and take a lot of time (usually minimum 4+ weeks).
The emails that hurt reputation are emails with poor clickthrough rates and high spam report rates. What good open and clickthrough rates look like varies by industry, but at a bare minimum you should aim for >10% open rate and >10% click to open rate. Good would be 2x-3x higher than that. Your spam complaint rate should be <0.1%, and good would be ~3-5x lower than that. A few patterns that most commonly result in poor engagement rates and high spam rates and can hurt your reputation if you are not careful are:
- Mass mailing the entire user base with a newsletter or feature announcement emails.
- Sending emails to large numbers of dormant users.
- Going from never sending users email at all, so suddenly sending them email. If you haven’t sent email before, start off with only emailing recently active users.
To prevent shooting yourself in the foot, you should have a required process in place for testing any new email your company sends. Whether it is a new automated email or a one-off marketing email, you should ensure the engagement rates on the email are good enough to merit scaling out. To do this you should do a test send to a small subset of eligible recipients (something like 0.5%) and measure the open and click rate compared to the average open/click rate for those recipients. You want to calculate the average for that specific set of recipients rather than your overall average open/click rate because different audiences will have very different baseline engagement rates with your email (ex: engaged users will click a lot more than dormant users.) If the engagement rates on the test email are near or better than average for the audience, then you should be able to safely ramp up the send. If the volume will be more than 2x your normal volume, you may need to spread out the send over multiple days because ESPs don’t like sudden significant spikes in volume. If the engagement rates are significantly below average, then that indicates consumers don’t find your email useful and you should strongly consider not ramping it up any further because it could potentially harm your sender reputation.
Hopefully this guide helps demystify some of the mechanics behind email reputation management and will help you ensure your emails don’t end up in the spam folder.